Showing posts with label Trys. Show all posts

Wednesday, May 14, 2014

Sweet Potato Ricotta Pizza


I don’t know about you but I thought potato pizza was becoming a known thing. When discussing what to do with sweet potatoes and blue potatoes from a CSA load, I suggested slicing them thin on a homemade crust. I got some strange looks from my co-workers. Well, apparently this trend hasn’t hit the West Texas culinary stratosphere yet. 


Despite this set back, I think this sweet potato and ricotta pizza with caramelized onions would make anyone a convert. I'm definitely on a mission to change minds about sweet potatoes. They are so good for you and a lot more versatile than the Thanksgiving rut most people put them in. 


I think you'll love the combination of sweet from the onions and delicate taste of the ricotta, melding together with the unlikely star: the sweet potato. I hope you give it a shot.


Personally, my favorite pizza crust is from the Working Class Foodies Cookbook by Rebecca Lando. The secret is the bread flour. I know this sounds silly but I’ve made the crust with both bread and all-purpose flours and the former results in more tender, soft crust by a landslide. If it’s a special occasion and you can get your hands on some 00 flour, that’s even better…


But honestly, if your are looking for a simpler weekday meal, try Pillsbury’s Thin crust pizza dough. In my opinion it’s the best pre-made option on the market…and it’s really tasty.

Sweet Potato and Ricotta Pizza
(Makes one 18- inch pizza)


Ingredients:
1 recipe homemade pizza dough or 1 Pillsbury thin crust, rolled out
½ large sweet potato (or 1 small), peeled and thinly sliced into rounds
½ cup ricotta (I use part-skim, but many prefer whole milk)
1 cup shredded mozzarella (commercial melts the best)
¼ cup freshly grated parmesan
1 small yellow onion, halved and sliced into thin half moons
1 garlic clove, minced
½ cup fresh parsley, chopped
2 tsp. herb de Provence (or mixture of dried basil and oregano)
1 tsp. sea salt, divided in half
black pepper
Olive oil
½ tbsp. butter
Optional: 2 tbsp. capers, rinsed

Directions:

Prepare pizza crust according to directions.

Meanwhile, heat butter and a good drizzle of olive oil in a large sauté pan over medium heat. Allow butter to bubble slightly and add onions. Saute for five minutes, stirring often so the onions brown but don’t burn. Reduce heat to medium low and cover with a lid. Allow the onions to sweat and soften. (Don’t add salt yet as this will impede carmelization.) Checking often, stir onions until very soft and browning. Take off lid and brown onions for about 20 minutes. If they start to burn, add a couple tablespoons of water and this will help. Cook until onions are a deep brown color and are still slightly wet. Add a pinch of salt and stir. Set aside. You can do this step a day or two ahead of time and refrigerate cooked onions.

In a small bowl, mix ricotta, ½ tsp. salt, herb de Provence, garlic, and half of the parmesan together.

Put sliced sweet potatoes on a large microwave-safe plate and sprinkle a little water and a pinch of salt over top. Cover tightly with plastic wrap and microwave for 3-5 minutes until sweet potatoes are tender and pierced easily with a fork. Allow to cool slightly.

When your crust is ready to be topped, start by smearing the ricotta as your base on the pizza crust. Evenly layer sweet potato over the ricotta. Sprinkle about half the mozzarella on top.

Scatter the caramelized onions and capers on top and cover with remaining mozzarella and parmesan. Cover the pizza with fresh black pepper.

Bake at 475 for 10-12 minutes if using homemade crust or according to package instructions. Sprinkle fresh parsley over the pizza.

Wait about 2 minutes until cutting, then serve.

Enjoy!

Wednesday, April 16, 2014

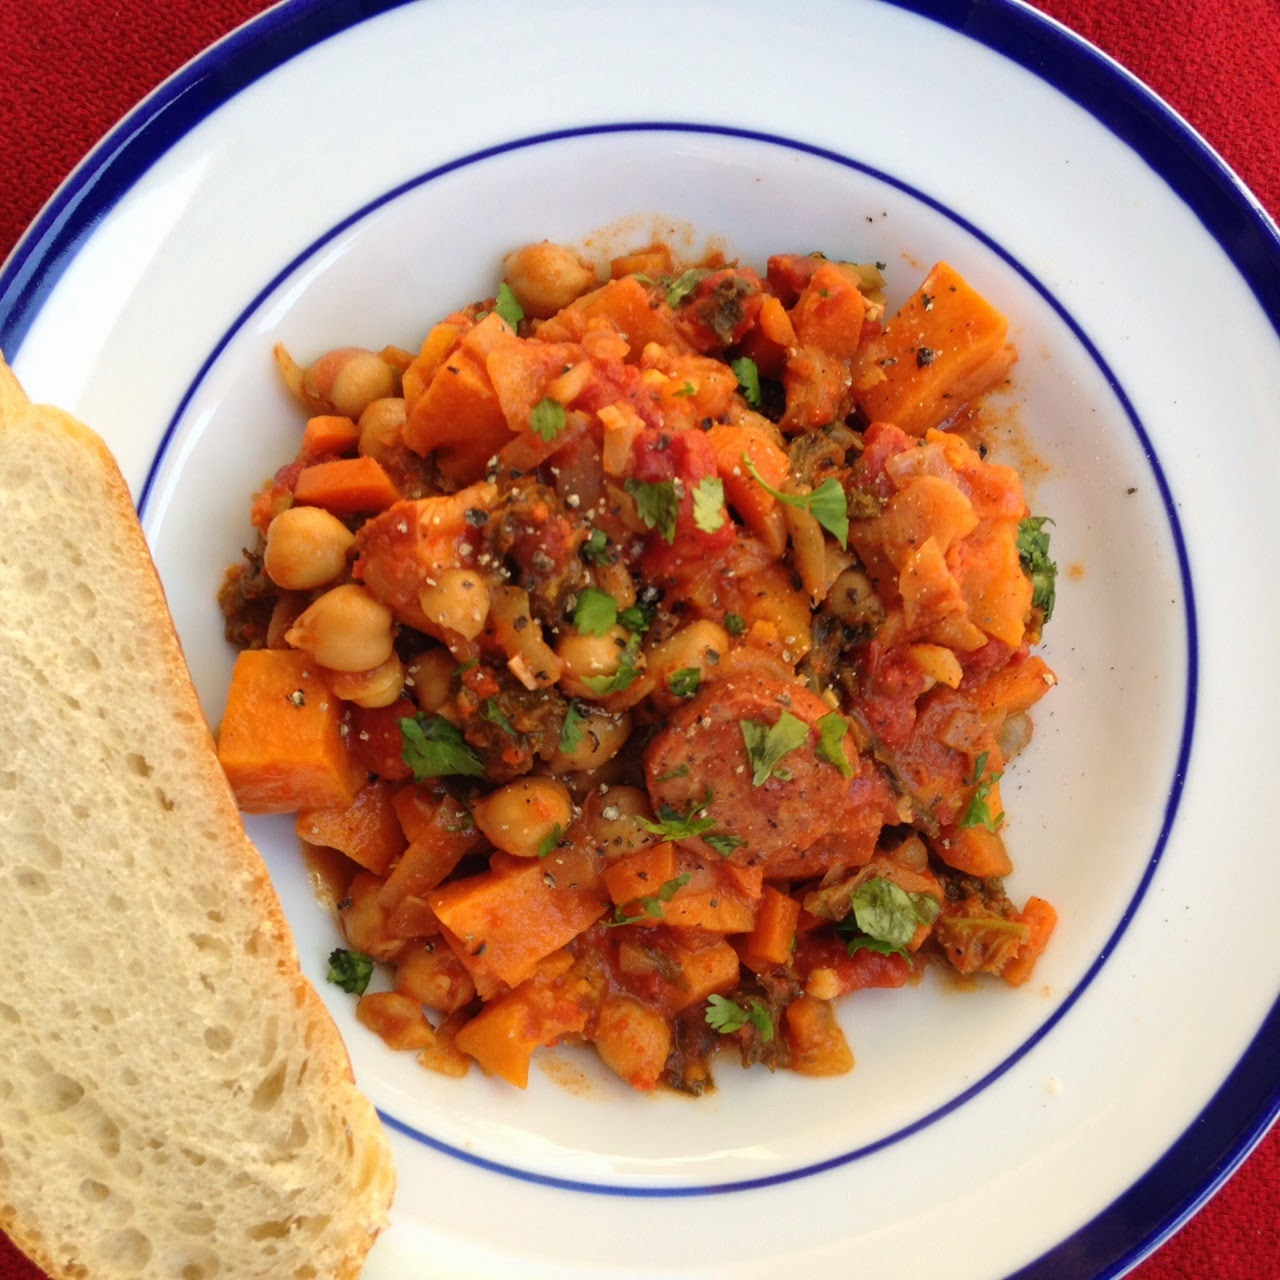
WIAW #64:Portuguese Chickpea Stew


I’ll be the first to admit that books often inspire my next culinary pursuit.  A good book can transport to the coasts of Spain or the rivers of India. Currently two books have made me yearn for experiences not so easy to come by in West Texas.


Peter Mayle, the prolific English ex-pat who lives and writes about Provence once again makes me want to return to France. In The Vintage Caper, set in Marseille, Rose wine is practically a requirement of conversation. I must admit I tend to stereotype the pink-hued wine as here in the States, “White Zin” and Arbor Mist have crowded the market making the readily available options on shelves and at restaurants to be one step above fruit juice. But despite the stereotype, I am on the hunt for a light, crisp, hardly sweet rose. I think I found one for Easter supper thanks to the local wine boutique down the street. They let you sample if you’re buying…

The second book is A Year in the World, by Frances Mayes, famous for her previous book, Under the Tuscan Sun. In this travel-autobiography, Mayes and her husband travel the world for a year in order to have new experiences and fulfill life long travel goals. She first takes us to Spain, then to Portugal. I’m quite familiar with Spanish cuisine and the tapas tradition. But like most Americans, Portuguese food is an unknown to my eating, and cooking experience.

I’ve always wanted to go to Portugal, known for its seafood and vibrant ingredients and bakeries. For some reason it is the one European cuisine that is not prolific in America. I’ve never been to a Portuguese restaurant, or known of one. In Mayes’ book, you can almost taste the fresh clams, the paprika, and the lemon. After reading this part of the book I long to travel to Lisbon and the neighboring towns. 


I’ve always heard the bread, pao, is incredible. I cannot wait to taste it one day.  Inspire as I was, I decided to take to the book quite literally and use as many of the ingredients as possible to make a Portuguese chickpea stew, as described in the book. Mayes talks about chickpeas, squash, and above all fresh coriander (cilantro,) being common and important ingredients in the cuisine. Fresh bread of course goes without saying. I love how hearty this dish is with just enough broth to soak up with bread, but not too much making this a soup. And what a lovely hued broth it is.


After looking over some recipes, I made my own version. I encourage you to mix and match depending on what you have around the house. I only included sausage in my stew, but beef, pork, and especially chorizo are all worthy ingredients. Make sure to use a good quality smoked paprika. This is a great dish to use up any vegetables you may have lying around such as carrots, sweet potatoes, squash, tomatoes, spinach, or any other type of hearty greens. It's even better the next for leftovers so bring on the veggies!


This is easily doubled or then some for a large crowd. The simplest one-pot version relies on a Dutch oven that you can sauté the vegetables in, and then transfer to the oven. You can even serve it tableside if you have a pretty one! If you don’t have a Dutch oven simply sauté vegetables in a pan then transfer to a baking dish. Or better yet, use a stovetop safe baking dish.


I've been happily eating this all week so it's my WIAW. And considering I sprained my ankle yesterday at work, I'm happy to have something to eat!

Portuguese Chickpea Stew
(Adapted from Rachel Ray and Saveur Magazine)
Makes 5-6 dinner sized portions


Ingredients:
1 lb. of your favorite sausage (smoked or chorizo goes well, even turkey sausage), sliced 1-inch thickness
3 cups loosely packed kale, washed, stemmed, and torn into medium size pieces
1 can (14.5oz.) diced tomatoes and liquid
2 cups chicken or vegetable broth
2 cups prepared chickpeas or 1(14.5 oz.) can
2 cups sweet potatoes or butternut squash, cubed into 1-inch pieces
2 celery stalks, finely chopped
3 carrots, diced
1 large yellow onion, chopped
2 tbsp. butter
2-3 cloves garlic, minced
2 bay leaves
1 tbsp. smoked sweet paprika
1 pinch red pepper flakes
1 pinch cayenne pepper or ¼ tsp. chili powder
½ tsp. onion powder
¼ tsp. garlic powder
1 tsp. Worcestershire sauce
black pepper and salt to taste
½-3/4 cup roughly chopped fresh cilantro (fresh coriander)
olive oil
Bread for serving

Variations: Try spinach in place of the kale (stirring in near the end of cooking,) add a pound or two of cubed Yukon gold potatoes for a larger crowd. 6oz. of Pork, lamb, or beef shoulder is also works. You could even stir in peeled shrimp at the last minute of cooking. If you aren’t a huge tomato fan, this would also be just as good if you supplement two cups additional broth for the tomatoes and add a few more carrots and celery.
Of course, this is very easy to make vegan simply by swapping the butter for olive oil, as well omitting the meat, Worcestershire, and using vegetable broth.

For gluten-free: Omit the bread and serve over quinoa or rice.

Directions:

Preheat your oven to 400 degrees Fahrenheit.

In a large Dutch oven, begin to brown onions over medium heat with a drizzle of olive oil. Once onions are soft and translucent, add butter, garlic, carrots, and celery. Cook for additional minute. Sprinkle with salt and a generous amount of black pepper. Stir the spices, including the bay leaves and Worcestershire.

Turn heat off and toss in sweet potatoes (or squash), kale, chickpeas, and broth. Pour tomatoes on top of the mixture and arrange sausage slices on top.

Cover with lid or aluminum foil and bake for 1 hour. Remove lid and continue to bake for 15 minutes until sausage looks browned and crispy. Fish out bay leaves and discard.

Either serve stew in the Dutch oven tableside or dish portions into shallow bowls and top with lots of cilantro. Serve with bread.

Enjoy!

Have you ever been inspired by a book to try a cuisine? Have you tried Portuguese food?

Wednesday, April 9, 2014

Thai Peanut Noodles with Crispy Tofu and Mago


Volunteering at a library bookstore does has its perks. Most importantly, I get them half off. Secondly, I get first pick of some beautiful cookbooks (and other books) for gifts and personal use. At two different library bookstores I’ve found editions of Food & Wine Magazine’s series, Best of the Best. I love the series because it is literally a collection of the best recipes from the top cookbooks of the year. That means you get an incredible variety of recipes from some of the best chefs and writers around. This one from the simply titled Recipes by Susan Spugen is no exception. 


Peanut Noodles with Mango is a simple Asian inspired dish that is easy to recreate at home. The recipe as is really good as a side dish but I wanted to make an entree for two hungry people. So crispy fried tofu seemed like a good fit. Chicken, or shrimp would also be delicious in place of the tofu. I like how crispy thinly sliced tofu gets in a shallow oil bath inside a dutch oven. That baby makes frying TOO easy. You can also pan fry the tofu in a skillet with just a couple tablespoons of olive oil.


I was afraid this recipe would be a little out of our normal dinner comfort zone as it is served cold. To my delight and surprise, Aaron loved this unconventional dish and promptly scarfed it down in about a minute. He also called dibbs on the leftovers. That’s how I know I have a hit on my hands.


I just happened to have a lovely soften mango and sugar peas on hand, so luckily this dish came together quite easily. I often keep toasted sesame oil on hand because it adds so much flavor. Try to get if you can. I also recommend a couple dashes of Thai fish sauce if you want to add a little umami to a dish, which is slighlty the sweeter side.


Another adaption I made to the original recipe was the use of PB2 instead of peanut butter. You can definitely use regular smooth peanut butter if you have yet to discover PB2. One reason that I recommend the former is the addition of flavor with only a ¼ of the calories of regular fatty peanut butter. The addition of 45 calories per tablespoon versus 200 calories of the traditional condiment makes this a little lighter for a weeknight meal. If you are serving this as a side dish at a barbeque, go ahead and use the regular stuff. I don’t believe in reduced fat peanut butter. There, I said it.

This is a crowd pleaser and perfect for when the weather gets a little warmer and the produce gets fresher. For kids, the mango and tofu are optional. They’ll love the peanut sauce! I’m sure you will too.

Peanut Noodles with Crispy Tofu 
and Mango
(Adapted from Recipes by Susan Spugen featured in 
Food & Wine’s Best of the Best, Volume 9)
For 2-3 entrée sized portions


Ingredients:
For the Peanut Sauce

½ cup PB2 peanut butter prepared with ¼ cup water, or ½ cup regular smooth peanut butter
3 tbsp. warm water
1 ½ tbsp. rice vinegar
3 tbsp. soy sauce
2 tbsp. toasted sesame oil
1 tbsp. grated or finely chopped fresh ginger root
½ tsp. red pepper flakes
¼ tsp. garlic powder
½ tsp. vegan sugar
¼ tsp. black pepper

For the Noodles
½ lb. spaghetti noodles (thicker, not thin noodles are best)
1 cup sugar snap peas or snow peas, chopped into 1-inch pieces
1 lime, juiced
1 ripe mango, peeled and chopped into 1-inch pieces
½ cup cilantro leaves, roughly chopped
1-2 green onions, chopped
salt
optional: ¼ cup roasted peanuts, chopped for garnish
sriracha and sesame oil for serving

For the Tofu
½ block extra-firm tofu, sliced into ½ inch strips, then cut in half
¼ cup all-purpose flour
½ tsp. garlic powder
½ tsp. onion powder
¼ tsp. chili powder
¼ tsp. black pepper
¼ tsp. salt
water and salt for soaking
Vegetable oil

Gluten-free version: Simply replace tamari sauce for soy sauce, don’t flour the tofu, and use your favorite gluten free spaghetti noodles.

Directions:

Add all ingredients for the sauce to a small food processer or blender and blend until smooth. Refrigerate until ready to use. (you can make this 2-3 days ahead of time)

In a small bowl, mix chopped mango with lime juice and a pinch of salt. Chill until ready to serve.

For the noodles, bring a pot of salted (2 tsp.) water to a rolling boil. Add spaghetti and cook according to package instructions. You don’t want soft noodles, so cook just a little more than al dente since you will chill noodles until allow them to rest to doneness.

At the last minute of cooking time, stir in snap peas to pasta water, cooking for no more than 1 minute until bright green and softened. Once pasta and peas and cooked transfer to a large colander and rinsed well with cold water at least twice so noodles do not get gummy with the chilled toppings and peas do not get over cooked.

Toss noodles and peas in the peanut sauce until well coated.

For the tofu, add slices to a shallow baking dish with warm water and 2 tsp. salt. Soak tofu for at least 15 minutes. Pull slices out and place on a plate or cutting board lined with paper towels. Cover slices with more paper towels and gently press down to press out water. Repeat one to two times until tofu is no longer soaking wet, only slightly damp.

In a shallow bowl, combine flour, garlic powder, onion powder, chili powder, and peppers.

If deep-frying, heat a large dutch oven or cast iron pot over medium heat with enough vegetable oil to cover bottom by about two inches. Test by dropping a piece of green onion into the oil. It is ready if the onion begins to sizzle on impact.

Once oil is hot, bread tofu slices in the flour mixture on both sides. Working in batches, carefully place slices in the hot oil and fry for 3 minutes, then flip for an additional minute, until both sides are lightly brown and crispy. Carefully take pieces out of the oil and place on paper towels. Sprinkle slices with the salt.

Serve dish as soon as the tofu is cooked. Spoon noodles and peas on plates, top with chopped cilantro, green onions, mango and tofu slices. Drizzle plates with additional sesame oil and top with chopped peanuts. Serve with sriracha.

Enjoy!

Monday, March 3, 2014

Dutch Oven French Bread


Valentine's Day concluded this year like most gift-holidays. I picked out what I wanted and Aaron bought it for me...and flowers. But hey, he got a bottle of Maker's Mark; so don't feel bad for him.


I've had my eye on this Le Creuset dutch oven for almost a month. I first saw it on clearance while browsing at Marshall's and almost got giddy. The 5 1/2 quart enamel cast iron oven usually goes for several hundred dollars on retail. This one being a "second" quality (though there was only two discolorations you can barely see) usually goes for $250....I got it for $80.


So let's just say I was so excited to break it out that I started using it the first night I got it. Two weeks later, I've started the tradition of "Sunday Bread." Since this recipe takes several hours of inactive time between rising, it is perfect to start before church or any Sunday morning activities and finishing later in the day in time for dinner and weekday sandwiches.

One good thing about this recipe (at least for me) it isn't the "no-knead" Dutch oven bread everyone else has been slinging around the internet because you do knead it in a mixer for 10 minutes, saving you the 24 hours in the fridge that the other version requires. If you have the time and/nor the mixer, here's the famous recipe for good "no knead" dutch oven bread.


I got this recipe from Le Creuset itself and I made it twice: once their way and once my way. What's the difference? Well as good as the bread I made first was, I wanted a slightly softer, more moist bread. Luckily my experiment paid off and I was rewarded with the same height and color of the previous loaf....while having a softer inside.

Alas, this changed how the dough appeared before baking it. Like some of the other breads and recipes I've made since I starting bread-baking a few months ago, my version makes a softer dough as well. With the addition of a little olive oil and pinch of sugar, I got the soft French bread I wanted. It also last at least a day without drying out. (After that I recommend freezing and thawing as needed.)


I do love the simplicity of this recipe and it makes me miss REAL French bread. I would love to see someone try this recipe in an oval Le Creuset to see if it turned into the oval loafs I love so much.

This is the best bread fresh as well as the next day for the best paninis, sandwiches, and my new favorite….French toast. Anyway you eat it you won’t be disappointed.

Dutch Oven French Bread
Makes 1 large loaf


Ingredients:
4 cups All-Purpose Flour (such as King Arthur)
1 ½ cup warm water (between 105-115 F degrees)
1 tsp. active dry yeast (about half of a packet)
1 tsp. Coarse sea salt plus additional for baking
1 tsp. sugar
Vegetable oil or vegetable oil spray
2 tsp. Olive oil plus more for baking

Note: It is important that your water is warm so the yeast will proof, but not too hot to kill it.
Also, try not to scope the flour with the same cup for measuring as you will acquire 30% more flour from the scooping. Instead scoop with a separate cup or flour scoop and carefully pour into the measuring cup.
P.S. make sure your dutch oven has a phelonic knob for the hot temperatures, otherwise remove the knob prior to baking.

Instructions:
 
Add flour, water, yeast, sugar, 2 tsp. olive oil, and salt in the bowl of a stand mixer fitted with a dough hook and at least a 5 ½ quart bowl.

Mix on medium speed (4 for Kitchen Aid) until the dough is smooth and elastic, 5-10 minutes. The dough should be coherent, but will also be soft and sticky.

Lift dough from the bowl, spray with vegetable oil, and then return dough to the bowl. Cover the bowl from the mixer with a pot lid or tightly with plastic wrap.

Let dough to rise until it has doubled in size and does not spring back when a finger covered in flour does not bounce back into it, 2 to 4 hours.

Turn the dough out onto a clean, floured work surface and knead it to release the gas and redistribute the yeast in the dough. Shape the dough into a ball and cover loosely with a towel, letting stand for 10 minutes to allow the gluten to relax from the kneading.

On your floured surface, shape the dough into a ball as tightly as possible by rolling it between your hands and pinching the bottom.
Using the vegetable oil, spray or coat the bottom and sides of a large French oven that’s at least 5 ½ quart big. Put the dough in the center of the pot and place the lid on. Allow the dough to rise again, for 30 minutes if warm and humid, 60 minutes if room is colder.

Preheat the oven to 450 F degrees.

Rub at least 1 tablespoon olive oil, gently over the surface of the dough. Score the bread with a sharp knife or razor, making an X or a hash mark (#) to let the dough to expand freely in the oven. Evenly sprinkle the dough with the salt. Cover the pot with the lid and place it in the oven.

After 30 minutes of baking, remove the lid and reduce the oven temperature to 375 F degrees. Continue baking until the bread is nicely browned and cooked through with an internal temperature of 200 F degrees with a thermometer (about 10-15 minutes.)

Remove bread from the dutch oven and allow the bread to rest on a wire rack for at least 30 minutes so that the interior finishes cooking.

Enjoy!

The Cuisiner

Monday, January 27, 2014

Better Morning Breakfast Bars


One of the best things about graduating from college was the break from early mornings. I hated 8am classes and figured any new job I got wouldn’t require me to come in until at least 9am. Then I got a job at the county library here in Texas. Here I was again getting up at 8am. Honestly it wasn’t so bad as the two months from October to December was the longest period since I was 15 that I wasn’t working or going to school. I actually missed being tired as it was then difficult to go to sleep at night.


The downside to waking up early is not having much time to have a healthy breakfast. For awhile I was drinking banana peanut butter smoothies or milk with protein powder but I wanted something I could grab and go and will keep me full.


That’s where these breakfast bars come in. I first saw them on the fabulous Lindsay’s blog, The Lean Green Bean. (She also has some great ideas for healthy food prep to last all week long.) While I didn’t have all of the ingredients, I did have most of them including some decent substitutes.


I am over the moon over these bars. Granola bars I get in stores never have everything I want in them (a.k.a. taste and health.) So, working with a base of  quinoa, gluten free oats and sweet potato, the gluten free vegan breakfast bars were born. I changed a few things from Lindsay’s original recipe out of necessity but if you’d like to try her’s, here is the link.


These bars remind me a lot of Fall and Thanksgiving, due to the sweet potato, cranberries, and spices. I love sweet potatoes. They are full of vitamin C and are so good for you. Plus, if you simply roast a couple for a dinner and keep a leftover one along with leftover quinoa for these bars. Or you could be like me and use the leftover sweet potato from a restaurant’s veggie side. (How convenient!) There are also several ways to make it your own with add ins like omega-rich walnuts for healthy skin, dried dates, your favorite type of GF flour, and lots more! I don’t like mine super sweet, but if you do, simply add a little bit more agave or mix in some chunky apple sauce. No matter what, these soft, chewy baked bars are perfect for the busy morning.

Once these babies cool, you can simply bag them up for an easy on the go morning meal or snack. With all this good stuff, these bars are low-fat and full of fiber. What’s not to love?


Better Morning Breakfast Bars
(adapted from the Lean Green Bean)


Ingredients:
1 cup cooked quinoa (about ½ cup dried once prepared)
1 cup gluten-free oats
¼ cup gluten-free flour such as chickpea, all-purpose, or almond (you can use traditional wheat or all-purpose if you aren't GF)
½ cup mashed cooked mashed sweet potato or pure mashed pumpkin
¼ cup peanut or other nut butter ( I used prepared PB2 at only 70 calories)
1 large egg or flax-egg
2 tbsp. agave nectar or honey
2 tbsp. dark coconut sugar or natural brown sugar
½ tsp. baking soda
½ tsp. ground cinnamon
1 tsp. vanilla extract
1 tbsp. sesame seeds
1 tbsp. chia seeds
½ cup dried cranberries
¼ cup roasted pumpkins seeds or ½ cup chopped walnuts
Optional: ¼ tsp. freshly ground nutmeg

Add-ins: 1/4 cup chopped dried dates or 1/3 cup chunky apple sauce for additional sweetness.

Directions:
Preheat oven to 375 degrees Fahrenheit.

In a medium bowl, combine sweet potato, nut butter, honey, coconut sugar, egg, and vanilla extract. Slowly add the rest of the ingredients to the bowl and mix until well combined.

Spoon mixture into an oiled 8x13 aluminum foiled lined pan. With a wooden spoon, smooth out top of mixture until even and flat.

Bake for 20 minutes, until golden brown. Bars are done when a toothpick put into the center comes out clean.

Allow bars to cool and cut into eight bars. Transfer to individual plastic bags and store bars in the refrigerator.

Variation: These bars are also delicious as baked oatmeal. Serve warm and pour vanilla almond milk over top.

Enjoy!

Tuesday, January 7, 2014

Cheater Cookie Butter Button Brownies


Two weekends ago, Aaron and I decided it would be a good idea to drive nearly four hours each way to Austin on dirt roads to spend five hours there on a dreary day…on a Sunday. Basically it was cold and very few things were open. The trip included a walk though of the Whole Foods Flagship store, the LBJ presidential library, and the best part…Trader Joe’s. You should know by now that I love Trader Jo’s, but they don’t exist here in West Texas. So Austin’s new store is the closest there is. I was very excited to get the pantry items I missed so much.


Brownie mix, Thai chili paste, $5 wine. You know, the essentials. So when I finally have in a bought a jar of the infamous cookie butter, I knew I had to do more than eat it with a spoon....at least in addition to that. That’s where brownies came in.


My high school friend said anything out of a box was cheating. As in cheater cookies or cheater brownies. My response was always, "I'm baking for you, stop complaining."


On that note this is as true of a “ cheater college recipe” as you've ever seen it. And it's amazing.


This is based in a recipe for real brownies with cookie butter so if that is more appealing, than all means, be my guest. But when my husband informs me we were invited to 6pm barbecue at noon, I decided to get creative....and cheat. Cookie butter brownies were born and they were a hit. So if you are short on time and what something that'll impress everyone, these babies are the answer.

Cheater Cookie Butter Button Brownies
Makes 24 bite sized brownies
(Adapted from Baker Girl)


Ingredients:
1 box, Trader Joe’s Brownie Truffle Baking Mix (16 oz.)
1 ½ sticks unsalted butter (6 oz.)
2 large eggs
½ cup Trader Joe’s Speculoos Cookie Butter or Biscoff spread
½ cup powdered sugar
1 tbsp. unsalted melted butter
extra butter for greasing 


Directions:
Preheat oven to 350 degrees.

Mix together cookie butter, powdered sugar, and melted butter in a small bowl, until well combined and the consistency of cookie batter.

Roll cookie butter batter into balls about ¾ inch thick, making about 24 balls. Place balls on a parchment  lined baking sheet and freeze for 10 minutes. Transfer to the fridge until ready to bake brownies.

Grease a 8x11x2 baking dish with extra butter, up the sides and all over the bottom.

Melt butter in a small sauce pan, stirring often and brown butter until it smells nutty then immediately take off heat and transfer to a heat safe bowl. Cool slightly before using.

In a large bowl combine butter and eggs until creamy. While mixing stir in brownie mix a little at a time into just combined.

Pour wet brownie mix into the prepared pan in a smooth layer. Carefully press cookie balls into the brownie mix, evenly four in a row and six across so balls are still sticking out of the batter but haven’t touched the bottom of pan.

Bake pan for 20-25 minutes until brownie batter has risen to the level of the balls and is set in the center when tested with toothpick.

Allow brownies to cool for 30 minutes before removing from the pan. Once brownies are cooled cut into bite sized squares around each cookie ball.

Enjoy!