Thursday, August 29, 2013

A Semi-DIY Wedding: DIY Fascinators


On March 3rd, 2012 my then boyfriend Aaron proposed to me in front of the Arch de Triomphe in Paris. At that moment I held naïve beliefs a year and a half engagement would be long one. Boy was I wrong. This weekend we were married at the State Capitol in Harrisburg, PA among the photographs my late father took and family and friends. I must say the day was just about perfect. But I definitely had my work cut out for me in planning it.


We don’t have all of photos yet but here are a few sneak peeks from our amazing photographer, Kalim including our DIY projects.

In my case planning a wedding takes a village, six bridesmaids, and a coordinator. This wasn't a "DIY" wedding but we also had several do-it-yourself accents.
 
chalkboard direction signs
 
 planted teacup favors with personalized seed packets
 Photos to come: wedding cake, centerpieces (except flowers)
 
 
bridesmaid gifts: personalized wine glasses for a day of wine tasting

And fascinators...

 
With all that said, DIY weddings aren’t always easy. We considered a lot of DIY options including are flower arrangements, but luckily we left the important things to the professionals. DIY weddings don’t always save you money, so consider what is worth both your time and money.

As more of our professional photos become available, I’ll offer more DIY instructions and tips.

Today, here was one of my favorite accents, which remains one of the easiest.

Worth it:       

Fascinators for myself and all my bridesmaids

 When planning an “English” wedding, you must have hats and fascinators! Buying fascinators can run you anywhere to a few hundred dollars just for one.  In order to makes ours a little easier to assemble, I purchased pre–maid clips from A.C. Moore for our base. These worked well because they provided both an alligator clip to attach to the hair as well as a smooth front for the fascinator to attach more feathers towards the back.
 
I was able to purchase these on clearance for only $1.75 each, but you can get them directly from the maker’s website, still making your fascinator much cheaper.


I also found the best deals for different types of feathers and birdcage netting on Etsy. Shop around and should be able to get several different types for low-cost per fascinator. Depending on quantity of fascinators, each one will cost as little as $4-5.
 
Supplies needed for each fascinator:

1 La Liberi White Feather Blossom Pin & Clip Flower (or alligator clip with back and more feathers)

At least two types of assorted feathers, 1 larger, 1 smaller (10-15)
1 square foot of birdcage netting whether French, English, or Russian style; cut into pieces for desired look

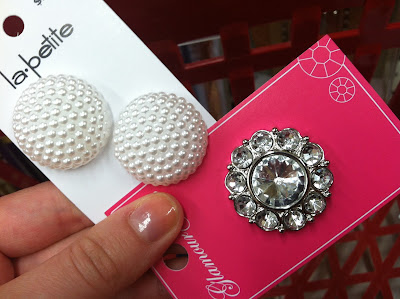
1 button of choice

Hot glue gun an glue

Directions:

Using La Liberi clip, remove safety pin from the back, leaving only the alligator clip.

Arrange desired feathers and desired amount of netting together the way you would like them to appear. Such as larger feathers in the back, netting in between, and smaller wispier feathers right behind the La Liberi clip. Use hot glue gun to attach feathers and netting, making sure they are enough glue to hold. Allow glue to cool between layers.

Once layers are set, use the hot glue gun to attach desired button in the front middle of the fascinator along with any other desired feathers or attachments.
Once cooled and dried, your fascinator is ready to where! For special occasions allow whomever is doing your hair to place the fascinator.


All of our fascinators were a little different, that made it more fun! These are great way to add a little English and vintage elegance to any occasion.


More DYI wedding tips to come! Any preference on what to see next?

Love,

The Married Cuisiner


Thursday, August 15, 2013

Goodbye to Chifa

Peruvian Cantonese? I asked the same question to myself a year ago before we first went to Chifa, for my birthday, the now closed Peruvian Cantonese restaurant in the Washington Square, Philadelphia neighborhood. 

Photos of Chifa - Restaurant Images
This photo of Chifa is courtesy of TripAdvisor

 
It was by far the most ambitious of Jose Garces restaurants and apparently a harder sell since it closed one month ago. If you were late to the news like us, the Garces Group has closed Chifa to open a Cuban diner in its place. I get it: you have to sell what appeals to the widest audience. I guess that's why Chifa's most loyal customers liked it, it didn't just appeal to everyone

 Based on the cuisine of Cantonese Chinese immigrants who moved to Peru in the 19th century, Chifa was all about Cantonese cooking techniques with Latin flavor. 

Courtesy of Visit Philly
Aaron and I have done the Chef's tasting menu with my family for my birthday celebration and have gobbled up their amazing happy hour deals more times than I can count. But I guess we were part of the problem, we LOVED Chifa, but we just don't have the money to drop $100 on dinner so instead we spent $40 on happy hour with drinks and tapa bites galore and called it a month. The wait staff and bartenders were always beyond impeccable. Thank you for being as nice to us between 5 and 7 as anyone else. I will miss you expertly done Inigo Montoya cocktail, $6 cava and tofu or pork belly bao buns more than you know.

Courtesy of Philly 2night

Garces other restaurants who are more traditional in their approach seem to be doing fine. Amada, Tinto, Garces Trading Company, Distrito and the list goes on.

 I get the reasoning behind closing Chifa, if you are going to charge what you charge you need to give the people what they want. With Alma de Cuba and Cuba de Libre, and many haute diners like the Continental already established, I wondered if a Cuban Diner concept will really make a splash. But hey, best of luck and I hope it works. You just better have the Inigo Montoya on your cocktail menu or I'm not coming...
 
Good bye Chifa, thanks for being awesome while you still could. Mr. Iron Chef Garces, I'm still kind of mad at you, but I'll get over it in a month...I think. Though I do accept bao buns as apologies. It's an official policy here. 

Love,

The Cuisiner

Thursday, August 1, 2013

WIAW #58: The "Bright and Sunny" Cocktail

Once again, I’m late to the party.  But hey, fashionably late right? Sure.

 
Well, on top of everything else I’m been so not good with documenting my eats with week due to many events including a wonderful Bride maid’s Outing on Saturday to some Bucks County Wineries. I really hope someone took photos!


But, seriously, what awesome ladies do I have backing me up? ( My Matron of Honor is behind the camera, way to go mom.)

But back to the very few of the eats I did document this week:
 
 
Baked mini ravioli with zucchini, sweet potatoes, and couple sautéed shrimp on top


Half of a stuffed brioche French toast with sautéed strawberries and bananas from work. Yeah, I get to look at this ALL DAY. Yet this is only the second one I have had in the 10 months I’ve worked there. I’m doing well.
 
 
And because this was so good, here is the recipe and recap for my new favorite cocktail, the ‘Bright and Sunny.”
 

Why is it called the Bright and Sunny you may be asking? Well, if you are like me, you may have noticed that “classic” cocktails seem to be popping back up on menus everywhere everywhere lately—including the Dark and Stormy. Seriously, something I have rarely seen before has now been spotted on 4 or 5 menus in the last month. And to answer your other question, no, I haven’t been drinking all of these I’ve seen!
 

The Dark and Stormy is a cocktail traditionally made with Goslings rum and ginger beer. But since ginger beer has fallen in popularity and therefore availability over the years, the drink wasn’t as easy to find. But what I am personally attributing to the rise in popularity of the very delicious and fancy Fever Tree drinks and mixers line, these babies are back.
 
I recently had the chance to try Fever Tree Ginger Beer when Aaron and I went shopping for our wedding libations. I’ve heard about the brand for awhile now, popping up in magazines and as I now see, menus as well. The brand boasts their all-natural ingredients and pledge to offer quality mixers to enhance your cocktails.

I was very happy to try the somewhat cloudy looking ginger beer, but since I found out recently I really don’t like the Dark and Stormy, I had to find another use for it.
 
Voila: the Bright and Sunny was born!

Really the only things this drink has in common with its predecessor is the use of ginger beer and a dark liquer. The Dark and Stormy, is a strong tasting drink. The B&S (yep, just realized my drink is BS,) is crisp and refreshing, therefore perfect for the last month of summer. This would also make a great pitcher drink as well for all of those late summer BBQs….

Reminiscent of a Pimm’s Cup, I promise you will drinking these well into Fall.
 
Bright and Sunny
(Makes 1 cocktail)


Ingredients:

1 bottle Fever Tree Ginger Beer (yes, it matters, and no it isn’t the same with ginger ale)
2 oz. Grand Marnier Orange Cognac
Juice of one fresh orange (about 4 oz.)
Squeeze of lime
Ice

Garnish:
3 raspberries
1 sprig of fresh mint
1 lime wedge

Directions:Fill a highball glass with ice. Add Grand Marnier, orange juice, lime, and top with ginger beer until ALMOST filled. Add mint sprig, and top with raspberries and lime wedge.
 

Serve immediately and enjoy.


Note: Really love your favorite mixer? Fill an ice tray with your favorite mixer (tonic, ginger ale, ginger beer, seltzer) and freeze until ready to use. This is the absolute perfect way to keep your favorite drink from getting watered down by anything other than yumminess!


Enjoy!

Love,

The Cuisiner


What’s your favorite Summer cocktail/mixer?