Thursday, October 10, 2013

Fried Green Tomato BLTs


This recipe was meant to be with me.  You see, I love everything about fried green tomatoes. Along with the Southern history of this dish, I love the 1991 Hollywood movie, and especially the way the crunchy fried topping melts into a sweet and tangy late season green tomato.

Fried green tomatoes aren’t just delicious, they are the BEST way besides green salsa to use up those pesky green tomatoes left on the vine when August is long over and Fall frost is around the corner. Up until last week we were pulling red and yellow tomatoes off the vine in my mother’s backyard to make everything from sauces, salsas, and sandwiches. But green tomatoes are one of my favorite parts of homegrown tomato-ing.

As you can see from the fried green tomatoes in the corner of this photo, we even had them at our wedding.
A few weeks back we sat down and enjoyed a truly magical batch of these delicious circles of wonder. After that, I couldn’t wait for the next frying, though my stomach needed a break! These babies are perfect on their own. I had no intention of changing them…not even dipping them in sauce.

Until…

While perusing menus of Nashville and Asheville restaurants for our moving-trip to Texas this weekend, I discovered a listing on a menu I could not stop thinking about.


Fried green tomato BLT.

 
Yep, it had happened. I found a way to have my tomatoes and eat them too. Get ready for one of the best sandwiches you've ever made at home. This is definitely an easy crowd pleaser.


We chose not to toast the bread as the tomatoes and bacon already added enough crunch and I feared toasting the bread would cause the sandwich to fall apart. If you chose to crisp your bread, try them grilled-cheese style, crisp in the pan. These sandwiches are plenty for a meal with all of the extra calories in my opinion. I felt full with one and a few extra fried tomatoes.

Note: these really don’t work well with red tomatoes as they are too soft for the breading and frying and will easily turn to mush. If you can’t get your hands on the green ones, try tomatillos instead and jazz up the aioli with some Mexican flavors like cumin and cayenne pepper.


At face value you may think, this is a bit gimmicky, just eat them on the side of your plate and have a BLT, but come on, there is always room for creativity. This recipe is pretty basic, soft chewy Italian bread, crisp thick cut bacon, herbed mayonnaise. Sounds like a good sandwich even without the fried green tomatoes, but trust me, it’s even better with them!
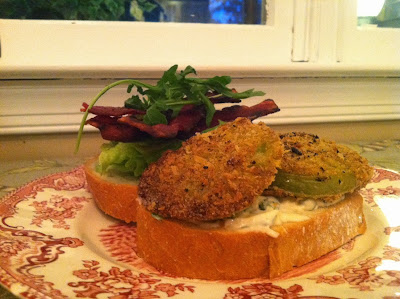

 
Fried Green Tomato BLTs
(Tomato recipe adapted from The Best of America’s Test Kitchen 2013)
Makes 5-6 sandwiches


Ingredients:
For tomatoes

6-7 medium green tomatoes, cored and sliced ¼ inch thick
2/3 cup fine cornmeal (we used instant polenta)
1/3 cup all-purpose flour
1/3 cup panko bread crumbs
1 ½ tsp. salt
½ tsp. pepper
1/2 tsp. chipotle chili powder
2/3 buttermilk
1 large egg            
2 cups bacon grease (taken from bacon) or vegetable or peanut oil

 For the Sandwiches

10 slices of hearty Italian bread
1 lb. thick cut bacon (turkey bacon also works)
10 pieces of romaine, butter lettuce
1 cup arugula

 Herb Aioli

1 cup Hellman’s mayonnaise
1 garlic clove, minced
4 basil leaves, chopped finely
2 tsp. shopped fresh oregano
1 tbsp. chopped chives
2 tsp. chopped thyme
1 tbsp. kalamata olive juice or red wine vinegar to taste
Sea salt and black pepper to taste

 (If using turkey bacon, you will need to use oil instead of bacon grease for the tomatoes)

 Directions:

Mix all ingredients for aioli together well and refrigerate until sandwiches need to be assembled.
Place tomato slices on a plate or cutting board lined with paper towels. Cover tomatoes with another sheet of paper towels and let sit for 20 minutes. Pat the tomatoes dry, use more paper towels if needed.

Combine all dry ingredients together in a bowl. In another bowl, beat egg with buttermilk.

Dip dried tomatoes in the buttermilk mixture, then dredge in dry mixture. Lay dipped tomatoes onto a clean plate or cutting board. Set aside.

In a large heavy frying pan, begin to cook bacon in batches over medium heat, rendering the fat and crisping bacon. Lay fried bacon on a paper towel-line plate. Do not clean pan.
Using the rendered bacon grease in the frying pan, begin to fry tomatoes in hot grease, leaving room between each tomato. Fry each tomato slice until golden brown on each side, for about 4-6 minutes.  With a spatula, carefully flip each tomato.

Once tomatoes fried, set them on paper towel lined plates.
To assemble sandwiches, spread equal amounts of aioli of bottom slice of bread. Top with fried green tomatoes, two-three slices of bacon, and desired lettuce/arugula. Keep each sandwich together with two toothpicks. Serve immediately while still hot.

Enjoy!
The Cuisiner

What is your favorite old-fashion recipe? How would you update it?


Monday, September 23, 2013

DIY Planted Teacup Favors and Seed Packets


One of the major headaches that weddings can cause is the question of favors. They can also be an afterthought if you aren’t careful about planning. What should we get in bulk to give to our guests to take home? What favors won’t cost a big load of money? What will they actually use and like?
 
Pinterest has definitely tackled that dilemma that will take brides beyond the standard candle or potted plant. These revolutionary ideas include everything from candy stations (which I have actually seen in person) to every small knick-knack that has ever come in bulk. But really how many pairs of cheap sunglasses do you need?


To go with our English theme I played around with the idea of using vintage tea cups collected from various thrift stores for my bridal shower. The ideas went from filled with homemade wrapped caramels, to briefly candles, and finally to potted plants. Despite the cliché, I liked the idea of individual plants in different teacups.
 
We even played around with attaching teabags to the teacups, directly plagiarizing from my bridal shower (I’m a hopeless bride.) Luckily, our wedding coordinators suggested seed packets instead.

Whether or not my guests will actually use the seed packets and potted teacups is still unknown. But then again, they were pretty.
The Breakdown:


You of course want a beautiful favor your guests will remember. But unlike the SNL skit, that doesn’t mean two tickets to Italy and $40,000. Hopefully these budget friendly favors will go over better than cheez-its and a mini bottle of water.

The teacups cost about $1 per cup at thrift stores, but if you have a bigger wedding than 50, I recommend finding bigger quantities for less.
We got the potted pansies $4 for 6, costing roughly about $1.50 per plant.

The cost of actual seeds which you can get in bulk from flowersoul.com ended up costing roughly 70 cents a packet (versus $2.00 a packet at retailers.)  They had quantities starting at ¼ lb. to multiple pounds so you can get different types of seeds like we did.
Including the printer paper, glue, etc. each favor cost about $3.30 said and done to make.

$1.00 Teacup and Saucer
$1.50 Plant
.70 Seeds
       +   .10 Paper/Glue
__________________
Total: = $3.30 each
Why DIY?
When doing extensive research about our particular favors, I found that traditional seed packets (that aren’t even that pretty,) you see at the garden store go for $1.50-$2.00 each and those aren’t even personalized! There are companies that will customize wedding seed packets with your names and image, but after the initial “personalization cost” of $85-$115 for your own “message,” in addition to .35 per packet for 50-100, we would have nearly reached our total budget just for the packets. Not to mention they only offered three types of wildflowers for the seeds. (If you don't want a DIY seed packet, that site isn't bad and they will send you a packet sample.)

 
After shopping around, I found seeds in bulk for much cheaper with a heck ton more variety. Armed with vintage seed packet clip art from Jodie Lee Designs and the Microsoft Office template, we could make our own packets that were really personal.

Not to mention the teacups looked awesome.
Verdict:

The Knot and wedding wisdom say budget 1-2% of your budget for favors, so we were “right on the money” so to speak. Either the teacup portion of the favor or the seed packet would make nice favors for your wedding or even a bridal shower.
The completed seed packets would also work as a part of another favor such as a small garden shovel, pale, wine glass etc. With a little bit of tweaking the template, these would also be great as combined place cards/favors for seating with the guest’s name printed on the seed packet.


If you have a smaller wedding like us and have the time to DIY, this was a very personal gift that a lot of the guests loved (and pocketed two or more.) If you have a more standard 100+ wedding, I recommend either the teacups or the seed packets. But hey, I heard you can get sunglasses in bulk!
How to do it yourself:

Planted teacup favors
with attached customized seed packets


Planted Teacups

You will need:
1 teacup and saucer
1 small plant, we used pansies in different colors (I recommend getting plants that are individually packaged in six-packs)
Extra soil if small plants
Water
Small shovel
Optional: Dot adhesives to attach saucers

 Directions:

Tips:

·         First check each teacup for leftover sticky adhesives or grim before planting.

·         You will want to buy the pansies and transfer into the teacups around the week before the wedding so flowers stay nice and don’t wilt. Keep in cool area, especially if it’s for a summer wedding.

·         If possible bring to space the night before so you don’t have to worry about these favors on the day of. Understandably, most coordinators won’t want to deal with watering the plants days before the wedding.

 Working with individual plants, carefully take plant out of plant container. Make sure each plant is a little wet. If not, water in container before transferring.
Depending on the size of the plant, you may have to take off some of the bottom root system. Do this carefully as you don’t want to hurt the plant.

Using the small shovel and your hands, mold the bottom of the plant to fit into the narrow teacup. Place the plant in the teacup and press down on the soil so plant is securely in the cup.
Once each plant is in the teacups, gently water if needed. Be sure to wipe off the teacups for any residual soil.

Optional: use dot adhesives to attach corresponding saucer to its teacup so they stay as one unit.
 
How to make customized seed packets:

You will need:
Desired seeds such as wildflowers, basil, or other plant (enough for 1 tbsp. per packet)
Printer paper
Quality color printer
Glue stick
Raffia or other string to tie seed packets to teacups
One Hole-punch
Desired clip art for seed packets (Check out Jodie Lee Designs for the ones I used)
Microsoft Word Template
 
Directions:

Download Microsoft Word Template and customize by adding desired clip art and text.
This can include a message from you as well as directions for the included seeds and vintage seed packet cover, photo, or other clip art.

Once you have customized and tweaked your template, print a tester on your color printer to test color. Once you like the proof, print desire amount of templates and carefully cut around black edges.
Once the printed seed packets are cut, carefully fold along the lines:

·         first sandwich each side of the packet together, making sure it lines up perfectly

·         Fold side flap first over; lining up with gray line. Repeat step with bottom and top flaps.

Using glue stick, glue side flap first, then bottom flap over top, careful not to get glue outside flap-lines. DO NOT glue top flap yet. Allow sides to dry.
Once dry, carefully open up packet and fill each one with 1 tbsp. of seeds. Shake seeds to the bottom.

·          Lastly, glue top flap, while leaving one edge of flap slightly loose so packets can be reopened once gifted.

·         Using hole punch, punch one hole into the glued top corner of seed packet. (Leaving the loose side for opening.)

·         Thread raffia through the hole and use to attach to handle of the teacup.
If this long break down hasn’t scared you away, I hope you consider this DIY favor for your special day!

What is the best wedding favor you’ve ever seen? What is your “dream” favor, if that’s even a thing?

Thursday, September 19, 2013

Red Lentils Lunch


For someone who just spent the last day and a half reading the new Cook’s Illustrated Cookbook from America’s Test Kitchen, I haven’t done too much inspired cooking.
 
Despite this I’ve become the main cook in our temporary house of four. With mother handling the sales and remodel of three respective houses, I’ve been doing a lot of the dinners. These have included tried and true classics such as homemade pesto, low-country boil, and super awesome turkey meatballs I probably can’t repeat anytime soon.

 
But one of the meals I’ve actually made myself was the end of a bag of red lentils that turned into something yummy.  The addition of sautéed onions, garlic, even frozen peas, etc. would be great in this for a protein packed lunch for one or two people. This recipe would also be excellent in tacos with lime and cilantro.
 
For this particular recipe, red or yellow split lentils work best because they turn to mush unlike green lentils which keep their shape.

Red Lentils Power Lunch
(serves 1-2)
 
 
Ingredients:

1 cup red split lentils
1 cup chicken or vegetable broth
¼ cup white wine
1 large carrot, grated
¼-1/2 shredded purple cabbage
2-3 chopped green onions or scallions
1 tbsp. olive oil
Salt
Black pepper
Garlic powder to taste

Directions:

Rinse lentils gently and transfer to a medium-small saucepan with olive oil after medium-low heat. Begin to sauté gently in olive oil for a minute or two until slightly browned.

Carefully add chicken broth and wine and bring mixture to a boil. Once boiling, cover and turn to low. Cook for 12 minutes or until most of the liquid is absorbed and lentils are soft.

Once cooked, season with desired pepper, salt if needed, and garlic powder. Top with carrots, cabbage, and green onions on plates. Serve immediately while hot.

Love,

The Cuisiner

Thursday, August 29, 2013

A Semi-DIY Wedding: DIY Fascinators


On March 3rd, 2012 my then boyfriend Aaron proposed to me in front of the Arch de Triomphe in Paris. At that moment I held naïve beliefs a year and a half engagement would be long one. Boy was I wrong. This weekend we were married at the State Capitol in Harrisburg, PA among the photographs my late father took and family and friends. I must say the day was just about perfect. But I definitely had my work cut out for me in planning it.


We don’t have all of photos yet but here are a few sneak peeks from our amazing photographer, Kalim including our DIY projects.

In my case planning a wedding takes a village, six bridesmaids, and a coordinator. This wasn't a "DIY" wedding but we also had several do-it-yourself accents.
 
chalkboard direction signs
 
 planted teacup favors with personalized seed packets
 Photos to come: wedding cake, centerpieces (except flowers)
 
 
bridesmaid gifts: personalized wine glasses for a day of wine tasting

And fascinators...

 
With all that said, DIY weddings aren’t always easy. We considered a lot of DIY options including are flower arrangements, but luckily we left the important things to the professionals. DIY weddings don’t always save you money, so consider what is worth both your time and money.

As more of our professional photos become available, I’ll offer more DIY instructions and tips.

Today, here was one of my favorite accents, which remains one of the easiest.

Worth it:       

Fascinators for myself and all my bridesmaids

 When planning an “English” wedding, you must have hats and fascinators! Buying fascinators can run you anywhere to a few hundred dollars just for one.  In order to makes ours a little easier to assemble, I purchased pre–maid clips from A.C. Moore for our base. These worked well because they provided both an alligator clip to attach to the hair as well as a smooth front for the fascinator to attach more feathers towards the back.
 
I was able to purchase these on clearance for only $1.75 each, but you can get them directly from the maker’s website, still making your fascinator much cheaper.


I also found the best deals for different types of feathers and birdcage netting on Etsy. Shop around and should be able to get several different types for low-cost per fascinator. Depending on quantity of fascinators, each one will cost as little as $4-5.
 
Supplies needed for each fascinator:

1 La Liberi White Feather Blossom Pin & Clip Flower (or alligator clip with back and more feathers)

At least two types of assorted feathers, 1 larger, 1 smaller (10-15)
1 square foot of birdcage netting whether French, English, or Russian style; cut into pieces for desired look

1 button of choice

Hot glue gun an glue

Directions:

Using La Liberi clip, remove safety pin from the back, leaving only the alligator clip.

Arrange desired feathers and desired amount of netting together the way you would like them to appear. Such as larger feathers in the back, netting in between, and smaller wispier feathers right behind the La Liberi clip. Use hot glue gun to attach feathers and netting, making sure they are enough glue to hold. Allow glue to cool between layers.

Once layers are set, use the hot glue gun to attach desired button in the front middle of the fascinator along with any other desired feathers or attachments.
Once cooled and dried, your fascinator is ready to where! For special occasions allow whomever is doing your hair to place the fascinator.


All of our fascinators were a little different, that made it more fun! These are great way to add a little English and vintage elegance to any occasion.


More DYI wedding tips to come! Any preference on what to see next?

Love,

The Married Cuisiner


Thursday, August 15, 2013

Goodbye to Chifa

Peruvian Cantonese? I asked the same question to myself a year ago before we first went to Chifa, for my birthday, the now closed Peruvian Cantonese restaurant in the Washington Square, Philadelphia neighborhood. 

Photos of Chifa - Restaurant Images
This photo of Chifa is courtesy of TripAdvisor

 
It was by far the most ambitious of Jose Garces restaurants and apparently a harder sell since it closed one month ago. If you were late to the news like us, the Garces Group has closed Chifa to open a Cuban diner in its place. I get it: you have to sell what appeals to the widest audience. I guess that's why Chifa's most loyal customers liked it, it didn't just appeal to everyone. 

 Based on the cuisine of Cantonese Chinese immigrants who moved to Peru in the 19th century, Chifa was all about Cantonese cooking techniques with Latin flavor. 

Courtesy of Visit Philly
Aaron and I have done the Chef's tasting menu with my family for my birthday celebration and have gobbled up their amazing happy hour deals more times than I can count. But I guess we were part of the problem, we LOVED Chifa, but we just don't have the money to drop $100 on dinner so instead we spent $40 on happy hour with drinks and tapa bites galore and called it a month. The wait staff and bartenders were always beyond impeccable. Thank you for being as nice to us between 5 and 7 as anyone else. I will miss you expertly done Inigo Montoya cocktail, $6 cava and tofu or pork belly bao buns more than you know.

Courtesy of Philly 2night

Garces other restaurants who are more traditional in their approach seem to be doing fine. Amada, Tinto, Garces Trading Company, Distrito and the list goes on.

 I get the reasoning behind closing Chifa, if you are going to charge what you charge you need to give the people what they want. With Alma de Cuba and Cuba de Libre, and many haute diners like the Continental already established, I wondered if a Cuban Diner concept will really make a splash. But hey, best of luck and I hope it works. You just better have the Inigo Montoya on your cocktail menu or I'm not coming...
 
Good bye Chifa, thanks for being awesome while you still could. Mr. Iron Chef Garces, I'm still kind of mad at you, but I'll get over it in a month...I think. Though I do accept bao buns as apologies. It's an official policy here. 

Love,

The Cuisiner

Thursday, August 1, 2013

WIAW #58: The "Bright and Sunny" Cocktail

Once again, I’m late to the party.  But hey, fashionably late right? Sure.

 
Well, on top of everything else I’m been so not good with documenting my eats with week due to many events including a wonderful Bride maid’s Outing on Saturday to some Bucks County Wineries. I really hope someone took photos!


But, seriously, what awesome ladies do I have backing me up? ( My Matron of Honor is behind the camera, way to go mom.)

But back to the very few of the eats I did document this week:
 
 
Baked mini ravioli with zucchini, sweet potatoes, and couple sautéed shrimp on top


Half of a stuffed brioche French toast with sautéed strawberries and bananas from work. Yeah, I get to look at this ALL DAY. Yet this is only the second one I have had in the 10 months I’ve worked there. I’m doing well.
 
 
And because this was so good, here is the recipe and recap for my new favorite cocktail, the ‘Bright and Sunny.”
 

Why is it called the Bright and Sunny you may be asking? Well, if you are like me, you may have noticed that “classic” cocktails seem to be popping back up on menus everywhere everywhere lately—including the Dark and Stormy. Seriously, something I have rarely seen before has now been spotted on 4 or 5 menus in the last month. And to answer your other question, no, I haven’t been drinking all of these I’ve seen!
 

The Dark and Stormy is a cocktail traditionally made with Goslings rum and ginger beer. But since ginger beer has fallen in popularity and therefore availability over the years, the drink wasn’t as easy to find. But what I am personally attributing to the rise in popularity of the very delicious and fancy Fever Tree drinks and mixers line, these babies are back.
 
I recently had the chance to try Fever Tree Ginger Beer when Aaron and I went shopping for our wedding libations. I’ve heard about the brand for awhile now, popping up in magazines and as I now see, menus as well. The brand boasts their all-natural ingredients and pledge to offer quality mixers to enhance your cocktails.

I was very happy to try the somewhat cloudy looking ginger beer, but since I found out recently I really don’t like the Dark and Stormy, I had to find another use for it.
 
Voila: the Bright and Sunny was born!

Really the only things this drink has in common with its predecessor is the use of ginger beer and a dark liquer. The Dark and Stormy, is a strong tasting drink. The B&S (yep, just realized my drink is BS,) is crisp and refreshing, therefore perfect for the last month of summer. This would also make a great pitcher drink as well for all of those late summer BBQs….

Reminiscent of a Pimm’s Cup, I promise you will drinking these well into Fall.
 
Bright and Sunny
(Makes 1 cocktail)


Ingredients:

1 bottle Fever Tree Ginger Beer (yes, it matters, and no it isn’t the same with ginger ale)
2 oz. Grand Marnier Orange Cognac
Juice of one fresh orange (about 4 oz.)
Squeeze of lime
Ice

Garnish:
3 raspberries
1 sprig of fresh mint
1 lime wedge

Directions:Fill a highball glass with ice. Add Grand Marnier, orange juice, lime, and top with ginger beer until ALMOST filled. Add mint sprig, and top with raspberries and lime wedge.
 

Serve immediately and enjoy.


Note: Really love your favorite mixer? Fill an ice tray with your favorite mixer (tonic, ginger ale, ginger beer, seltzer) and freeze until ready to use. This is the absolute perfect way to keep your favorite drink from getting watered down by anything other than yumminess!


Enjoy!

Love,

The Cuisiner


What’s your favorite Summer cocktail/mixer?